December 28, 2012

Christmas Day


 Christmas-time is here! We spent Christmas with family and friends, enjoying each other's company, cooking, playing games, feasting on lots of goodies, and sharing gifts. Here's some moments we captured  of the day.


  Enjoy the holiday season. See ya soon!

December 22, 2012

Gift Series Part 5: The Stockings Were Hung

 Merry Christmas! Finally we are putting up the last of our Christmas decorations, including the stockings I made for the family.


I used a drop cloth my hubby purchased at the Home Depot for about $13. What a deal! I had to bleach it three times to get the color I wanted, but it was well worth it. I'm hoping these stockings will be in the family until the kids have moved on.
I'm sorry to say I forgot to take pictures of the process, but for a step by step tutorial on stenciling, stop by here


I'm taking a break over the holidays, but I will be back after Christmas. I wish you and your loved ones a joyful holiday season! Thanks for visiting my blog. See you soon.

December 20, 2012

Gift Series Part 4- Spreading Joy to Neighbors

We spent all day yesterday baking cookies for our neighbors. By the end of the day, I admit, I was flustered and ready to put my feet up. The kids and I decided we HAD to sample a little bite of each cookie to make sure they were tasty enough to share. One bite of a Peppermint Bark Cookie, and all our effort was worthwhile! 


When we were younger, my brother's friend always brought us a plate of homemade goodies for Christmas. I loved seeing all her creations, partly because they were different than the amazing treats my aunt spoils us with every year. Can you tell I have a touch of a sweet tooth? 

The kids were so excited to deliver the plates to our neighbors. Ben rehearsed what he would say when they opened the door. I'm grateful for my little elves. Sometimes having three extra sets of hands in the kitchen is challenging, but I love how much they enjoy cooking and baking. 

What are some of your traditional holiday goodies?

December 17, 2012

Gift Series Part 3

 I can't believe how quickly time is flying. Christmas is almost here and I am still at the sewing machine trying to finish last minute odds and ends. I foresee a few late nights this week. And possibly a trip to the chiropractor for my neck which is out from lots of sewing!

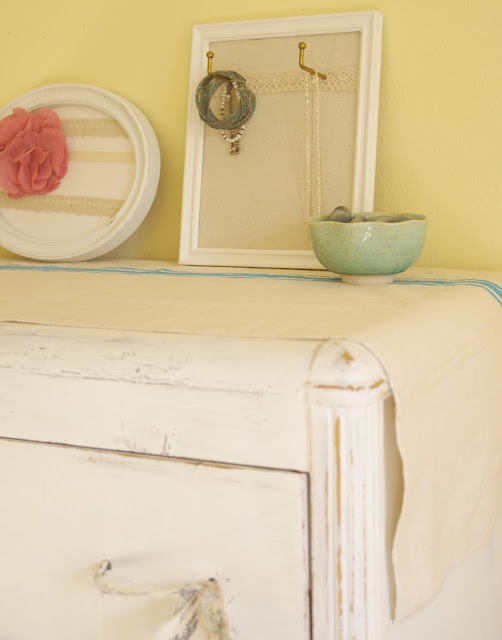
 These jewelry organizers are about ready to ship across the country. I painted some frames I found at the thrift store, covered one in drop cloth, and dressed them up in ribbons and hooks.


 The oval frame on the left is meant for earrings, but I don't have my ears pierced, so I have no earrings to display. You get the idea. Just hang your earrings on the ribbon. I lost my upholstery tacks I had originally planned on using to hang the vintage lace ribbon in place, so instead I busted out the hot glue gun and secured it along the middle, making sure to leave the top free for the earrings to hang.

To hang necklaces and bracelets, you can also use cool knobs, and thrift stores are a great spot to find any sized frame for a reasonable price. If you know the recipient has a lot of jewelry, you could make one large frame or a collection of several smaller sizes. I'm sending this pair with one additional cast iron hook I found on Etsy for additional space to hang necklaces.

 Well, I hope you are getting close to ready for the holidays. Wish me luck. I'm off to work on gifts for the girls.

December 8, 2012

A Get Well Gift

 For the past several weeks we have been making lots of chicken soup and tea with honey. This week it's my turn to be sick. When it came time to make dinner, I thought, "Wouldn't it be nice if someone could make us some soup so I can rest?" That's when I came up with this post, a 'get well' gift for a neighbor, or friend too sick to venture out in the cold for supplies, or a family in need of rest.


 If you have a thermos, or empty jar with a lid, fill it with hot homemade chicken soup. You can make a little basket  with a good loaf of bread, tea, lemon and honey, and various forms of medicine you know they need/like. Since they'll be spending time resting, you might add magazines or a good movie or favorite book. Just make sure to let them know if these are on loan, and label anything you need returned :)


 Sometime soon I hope to share our favorite "go-to" recipe for chicken vegetable soup. It's an easy dinner for a cold winter's night.

Stay well!

December 5, 2012

Gift Series Part 2

  Happy Advent! Thanks for following my series on homemade Christmas gifts. This one is perfect for Advent decorations,  but you can use it throughout the year too.

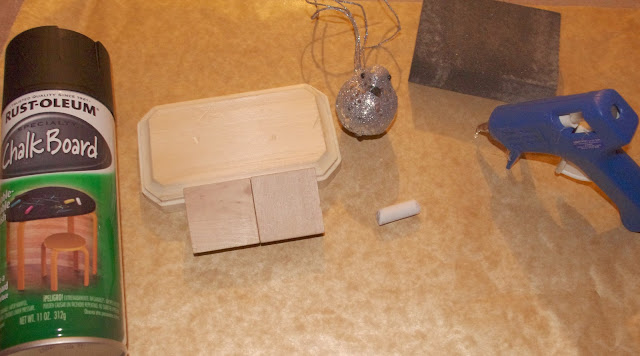
 All you need is wooden blocks, a hot glue gun, chalkboard paint, and, if you want, something to decorate the blocks. I'm making this for a friend who loves birds, so this festive critter was perfect for her Countdown to Christmas chalkboard.


 First, glue your blocks together. Then spray with chalkboard paint and let it dry. Repeat. Glue your decorations to the top and you are finished. You can easily complete this in an afternoon, if you start early enough to let the paint dry between coats.

 To use throughout the year, write the date on top and month on the bottom.


November 30, 2012

Gift Series Part 1

I've been busy working on Christmas gifts for family and friends.  Here's an easy gift for toddlers that can be finished in a couple hours. This little guy goes to my nephew.


 Now don't laugh at my lion's head, it should have been more round. You can adjust your shape. I say no matter what, it has character. 

 I found the idea online, and already had the ribbon, terry cloth, felt, and stuffing. To make a lion for someone on your list, cut out two round (ahem) pieces of terry cloth. Use brown felt for the nose and eyes, and sew them onto the front of one piece. I used my triple stitch setting on my sewing machine to make a smile. 

 Choose an assortment of ribbons for the mane. Cut them into various lengths ranging from about three to five inches. Lay your lion out in the following order: terry cloth right side up, ribbons folded in half with the loop toward the inside center and the raw edge facing the outer edge of the terry cloth, and the face of the lion right side down. Pin all the ribbons in place.


 Sew carefully as you go along, making sure to catch all the layers. Leave an opening about two inches wide. Trim the edges of the ribbon that stick out beyond the edge of the terry cloth, and turn your lion inside out.

 Stuff the lions head tightly, and hand sew the opening. You will need to sew the remaining ribbons from the open spot by hand. Just fold the ribbon in half, tuck the raw edges inside your lion, stitch them in, and finish the closing. You're finished! Cross that one of your list.

November 28, 2012

Checking it Twice

 You know when you wake up in the middle of the night and your brain starts going? Then you can't fall back asleep and you start thinking about how tired you will be the following day. A couple nights ago I was up for three hours (which is unusual for me). After two hours of trying to force myself asleep, I gave up.


 Instead, I flipped on the string of white lights on the mantle and grabbed some of my favorite sewing books to browse. My mind was busy planning Christmas presents for friends and family. I make most gifts, so every year around Thanksgiving I start thinking who needs/wants what. I know it might sound stressful, but honestly, it's one of my favorite things about the holidays.

 Forty minutes later, after a bite of almond butter to keep my blood sugar happy till morning, I was sound asleep. The next morning I made my list and I am super excited to share some gift-giving ideas.

November 21, 2012


  We had a great time at the "Over the Rhine" concert last weekend. The Triple Door in downtown Seattle is an old theater turned into a restaurant. An ideal spot for a fun, relaxed concert. I'm thinkin' a night away with the hubby needs to happen more often.


 The bibs turned out to be a hit at the market. It was fun figuring out how to display my handmade products and come up with new ideas for next time. 


 Happy Thanksgiving! I hope you enjoy time with family and friends and good food.  We will be packing our bags and heading north to our home away from home. I'm looking forward to cranberry and sausage stuffing,  sweet potato casserole, homemade cranberry sauce, "broccoli dish", turkey and pie. I'm getting hungry just thinking about it!

November 17, 2012

Date Night

I have been looking forward to tonight since summer. We are dropping off the kids and heading to Seattle for date night. First stop, a quirky Italian restaurant for dinner. Then we are going to see "Over the Rhine."

Seriously, I can't even tell you how excited I am. I'm all dressed up, thanks to an awesome friend who lent me some maternity clothes (you know who you are), my hair is done, and my bags are packed for a night in the city.

 Other news... I spent the past two weekends selling some of my handmade creations in local Bazaars. It's been a fun new experience. The first time I forgot my camera, but I managed to get a few pics today to share soon.

October 23, 2012

Easy Fall Decor


 Most of you probably have beautiful fall decorations to celebrate the season. In our house, things are still looking "summer-ish." I am on the hunt for a nice garland for the fireplace, and a berry wreath for the door. I'd like to recover our couch pillows in a fabric that works for fall and Christmas. Until then, I hang cut-outs of owls and pumpkins.


 We are still trying to get our pumpkins. I staged these pictures, although the pumpkin patch was closed. Just in case we get rained out and have to buy ours at a grocery store, we can pretend we went. Next year
I plan to have my own pumpkin garden, now that I have space for them.


October 16, 2012

Fall Legwarmers

 We are adjusting our daily routine to homeschooling. While we practice our letters and numbers, I manage to knit a few rows onto the legwarmers I am making for the girls. That's one of the things I love most about knitting. I can take it anywhere with me and feel like I am getting something accomplished.

October 9, 2012

  It looks like our long stroke of sun is almost at its end. We have been outside trying to finish some projects we started over the summer. As always, there doesn't seem to be enough time in the day.

Transplant Mums

Put up Fence and Clothesline

Plant Cyclamen under Rhododendrons

The Good, the Bad, and the Ugly of Building our Tree-house
  I'm not sure we're ready for rain yet. But my sewing machine is missing me, I think, and it will take a change in weather to force me indoors and back sewing. I'm planning some fall skirts, tunics, and things for the baby.

October 2, 2012

Baby Long Long

Source

As the title of this post suggests, I am pregnant with Baby #4! I'm still in the feeling icky stage, which explains why I have not been around as much lately. Still here, but only in survival mode on my best days. The baby is  due in May, which means our first spring baby. I'm excited to be able to enjoy those first months outdoors without having to bundle up first.

 I had to pull out my baby band to hold up my jeans today. I don't remember ever showing this much this early on. It's motivating me to either find some cute maternity clothes or design some fast. If you live in the Vancouver/ Portland area and know of any good consignment shops, please let me know. 

September 14, 2012

The Little Things

 You know how sometimes random little things make your day? Yesterday I had a doctor's appointment. My generous mother-in-law watched all three kids, taking them to get haircuts and have dinner with their aunt. Such a treat for all of us.

 Anyway, after the appointment, my husband and I stopped off at New Seasons supermarket to grab a few things. We stopped by the sample counter to pick up a few gluten-free recipes that caught my eye. The lady  told me about some of her favorite alternative flours, including this one. 


  I wanted to try it, but it was expensive. On our way through the check-out line, the "sample lady" came over with a bag as a gift for me to try. That never happens! So not only did I have the afternoon off, but I had a free bag of coconut flour to try. This was my first time in New Seasons, and they made quite an impression. What a day, what a day :) 

P.S.- I used the flour in my crepes this morning and it is fantastic. If you are in Vancouver on Saturday and are interested, there is a gluten-free fair at New Seasons. And no, I am not being paid to share this with you guys. Just a thought on how we can make people's day with small acts of kindness. 

September 7, 2012

Knights and Ladies

 Our first year of school started this week. I'm laughing at this picture of our first day because it reminds me of my second grade teacher telling me I looked like an orphan with my collar up. Like mother like son.


  Also on our list this week is a birthday party for my niece and nephew. I made them capes from a pattern  I  modified from Pinterest:

Brother's cape has a felt cross stitched onto the back
The fabric was a crushed velvet on clearance at JoAnn's. Score. And the velvet doesn't seem to fray, even after washing and drying, so I just cut out the cape and handed it over to the kids to test it out. Easy and fast.

 I folded the fabric in half, wrong sides together. 

 To determine the length, measure from the back of the neck to where the cape should fall on the back of the leg. Add 6.5 inches to this measurement to allow for the head opening. For instance, if you want the finished cape 19 inches, measure 25.5 inches from the top of the fabric and mark it with a pin.
  
 To determine the width, measure from shoulder to shoulder. Divide this number by 2 and add 4 inches. Measure from the folded edge of fabric toward the center, and mark with a pin. Measure and pin again every three inches all along the outer width to the bottom of the cape.

 Cut out the cape, following the pins, and rounding out the edge of the top corner. 

 To make the opening for the head,  measure 2.5 in. from the top of the fabric, and place a pin to mark the spot. Measure another 4 in. from the first pin. (This material stretches, so you might want to start with 3 in. and make the hole larger if you find it is too small.)


 Next, measure 2.5 inches from the folded edge toward the center of the fabric and mark it with a third pin.


 Cut around the outside of the pins to create a circle, like this:


I hope that helps. You can also use jersey, which does not fray, or extra- large sized kids' shirts and just leave the head opening but cut off the sleeves. These were capes for knights and ladies, so we needed something fancy.

Ready to roll within minutes! 

August 30, 2012

The Backyard


I finished the quilt! And in a free moment, while I took pictures of the blanket, I snapped some photos of the garden. We've made some progress this year, but it's still far from where we would like it to be. I'm having fun with it, though.

Zinnia

Salvia

Front

Back

August 23, 2012

Winter to Summer Quilt

 Summer is nearing it's end, and I intend to enjoy every last minute of it. Last night I read Sherlock by the fire in our backyard. Today I took advantage of the kids playing nicely together (a rarity lately,) and worked on this quilt while they picked blackberries and raspberries and chased each other.


 While I watched and listened from the window, I made substantial progress. I should have finished this gift  last winter for a friend. Better late than never, I hope.

 I'll let you know how it turns out. 

August 17, 2012

Camping


Our family spent the weekend camping together at Crescent Lake. It was gorgeous. Hiking along the lake. Kayaking. Enjoying waterfalls and campfires. 

When we were kids we camped the first two weeks of August. One week was spent in the mountains and the other at the beach. We had an old huge canvas tent that could sleep about 10 kids and several adults. Before we set it up one of us had to get all the rocks off the tent spot so we wouldn't sleep on lumps. Now we bring an air mattress and pack'n'play for Addy. Roughing it, I know.