December 21, 2013

Christmas Gift Making Series: Part III

It's beginning to look a lot like Christmas! I can't believe we are just days away. I'm sending packages and finishing last touches on gifts for the kids. If you are looking for some last minute ideas, take a look.

First on the list are these boot toppers.

These made with a soft, chunky weight yarn.  I used two needles, and when I was finished, sewed the two ends together with a knitting needle. Directions are below. The tweed pattern seen on the lower half  requires multiples of 2 plus 1, so I first cast on 41 stitches. The top rows were ribbed  (knit two, purl two - purl last three stitches.)  Once I reached the length I wanted, I began the tweed. 

Row 1: (Right side) purl 2, *yb, slip a stitch purlwise, yf, purl 1, repeat from * to last stitch, purl 1
Row 2: knit 1, yf, slip 1 purlwise, yb, k1 repeat from * to end of the row

Yarn back (yb)- place the working yarn, or tail from the right needle to the ball of yarn, to the back
Yarn front 9yf)- bring yarn forward of the right needle

Then just cast off and weave in ends or tie in small knot, if you prefer. To sew your side seams together, turn the boot cuff right sides together. I threaded a large eyed needle with the same yarn, tied a knot at the end, and sewed the seam together by inserting the needle into the stitches closest to the outer edge. I prefer a small knot, and then wove in the end. 


These boot cuffs were made using a lace pattern from knitpicks.com. It's a little more time consuming, but so beautiful when it's finished. 


The second gift I made was inspired by Country Living. I should say, my father-in-law made. 


I told him the idea, and he put it together for me. Thanks Gramps! I needed an elf to help me finish. 
To make an I-Pad/ recipe holder, you need a cutting board, a ledge (we made one, but you can use one from the Scrabble game or glass knobs) and a triangular piece of wood strong enough to hold it up in the back. We used some of that gripper stuff for the bottom, just to keep everything from slipping. Then use a hot glue gun to put it all together! 

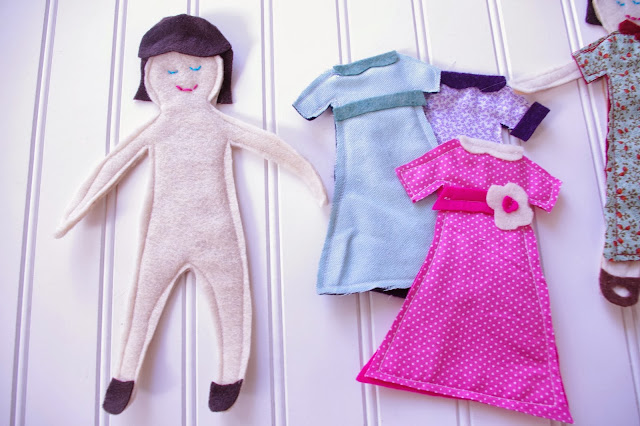
Last up are these felt dolls. 

Each doll is made by stitching together two pieces of felt from a hand drawn pattern I made. For the dress, I cut the a piece of fabric and sewed it to felt. I used fray protector along the outer fabric edge. The faces are sewn with embroidery floss. 


The End. 

Merry Christmas!!!

December 12, 2013

Gift Making Series- Part II (Scalloped Hem)

 Happy Feast Day! If you want a simple, ten minute way to decorate for Our Lady of Guadalupe, here's a couple easy ideas. We read about Juan Diego and Our Lady of Guadalupe. Then we looked online for a small picture to print.This image is not the traditional Our Lady of Guadalupe; Addy chose it.  Then we cut these felt flowers to put around the picture.


I cut a curvy circle, about 4 in. in diameter. On one of the outer ripples, I started cutting into the circle and just continued to cut around in about 1/2 in. circle all the way to the center, leaving a little hook in the middle. Starting from the center, tuck in and around to the outer edge, securing with stitches or hot glue. I spread it out here, just to show you what it looks like.


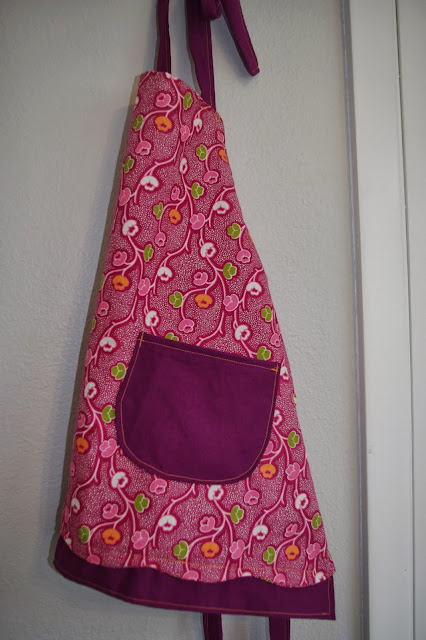
I'm following up this year's gift making series with a scalloped hem I added to a kid's apron. For years I have wanted to try making this apron from Anthropologie.


To make the scalloped hem, I added an extra 1.5 in. to the bottom of the apron. Sew the rest of apron as you normally would, turning back the edges twice, press, and sew. Do not sew along the bottom yet. 

The next step is to either serge or cut along that bottom edge with pinking shears to prevent fraying. Turn the bottom edge 1.5 inches to the right side and iron.


This next part is where we get creative. Don't worry, if I can do it, we can do it together. Measure the width of your bottom hem and determine how big you want your curves. I wanted mine 4 inches long and 1 inch deep. Using a Trader Joe's paper bag, I measured and marked those increments on the paper and cut it out. You could also use a can of stewed tomatoes, olives, or diced chilies, by continuing to draw along the outer edge of one side. Just evenly divide your width into the number of scallops you want.


  Trace you pattern with chalk directly onto the wrong side of the pressed hem. Sew just inside the traced line, taking your time around the corners so you have a smooth curve. Then, cut the fabric close to that sewn line, leaving about 1/4 in. seam. 

 Turn the fabric right side out, using something like the handle of a wooden spoon to press out the corners. Press. 


I wanted an additional border behind the scalloped edge. To do this,  cut a rectangle 5 inches wide and 1 inch wider than the finished bottom hem. Fold the rectangle in half lengthwise, press, and sew along the open edge, leaving 1/4 in. seam. Turn right side out, and press. Tuck the sides about 1/2 in toward the inside of the rectangle and press, making sure the edges match up with the outer edge of the apron. Sew closed.

Pin to the bottom edge of the apron, about 1/2 in. from the top of the rectangle. Sew pieces together.


 That's it. A fairly easy gift for a kid's apron.  Or for an adult, you might add some favorite recipes, cookbook, or  new serving dish. Or some homemade jam or honey. Maybe even a new cutting knife or silverware. You could make hot pads to match. Fun!


 And so the boys aren't left out, here is the tractor/car apron I made. Happy Feast Day!

December 6, 2013

Gift Making Series Part I- Felt Food


Happy Feast of Saint Nicholas! We are loving our first (almost) winter snow! The kids are pink nosed, chasing snowflakes and loving every minute of it. Even Baby Evelyn watches from the window and smiles. It's magical. Just like this season. 

Since Christmas is coming, it's time to get busy making presents. If you need a quick kid's gift idea to finish in an afternoon, felt food is simple and inexpensive. You could whip up a set of fruit and veggies, or toast and eggs, before Christmas. There are lots of free patterns online, and at our local fabric store they had 5 felt squares for $1. I have some polyfiber fill, which most craft stores carry for around $5, I think. 

Below I have instructions for the orange slices I made for Addy's birthday. For more ideas, this is a good start. 
 

For each slice, you will need one three inch in diameter circle, and one orange circle about 1/4 smaller. The "peel" is about 3 3/4 inch long and 1 1/4 at the widest part. I just cut a pattern piece from paper, traced it onto the felt, and cut. I made two, so I cut two of each from my pattern.


I handstitched the orange circle to the white first around the outer perimeter, and then sewed larger stitches with embroidery floss. They don't have to be perfect. 


Then, starting from the inside to hide my knot, I sewed small stitches around the outer peel and white circle piece. Before closing it all the way, I stuffed the orange with poly fiber fill, and then completed the sewing to close the hole. 


December 2, 2013

Advent Begins

Happy Thanksgiving everyone! I've been under the weather the last few weeks, but I am so so grateful I was able to join family in celebrating a wonderful Thanksgiving.

 And now,with Advent starting yesterday, we are already looking to Christmas. I went to a brunch at Church last weekend to get some ideas for celebrating this season.  My main focus this year is to keep things simple, peaceful, and meaningful for the family. I want our home and hearts ready to welcome the Christ child. So this year, to keep me grounded when I want to make 50 things before Christmas, I am going to slow down and make time for prayer every day. We didn't get a chance to make a Jesse tree this year, but I found this list of daily Bible passages to follow the story of salvation history up to the birth of Jesus. Tomorrow, for example, when we read the story of Adam and Eve in Genesis, the kids can draw an apple and serpent, or Adam and Eve. Next year we'll do the ornament exchange for the Jesse tree; this year we'll keep it simple.


 Another Advent tradition is filling a jar with 24 separate, realistic goals for each day. We wrote on small strips of paper things like, "Share our toys," and "Listen first time." Each day we draw one goal out of the jar and encourage each other to do it that day. By evening, if we have met the goal, we'll place the strip of paper in a manger, like straw, making a warm soft bed for Jesus. Today was "Use kind words" and the kids had to remind me at one point that we don't want a bare manger come Christmas. Who's idea was this anyway? This might be a little more difficult than I anticipated.

 Another exciting idea for Advent is celebrating the feast days during the season. Here's a few ways you might try:
 St. Nicholas (Dec. 6) - Traditionally, the kids put their shoes out before bed on Dec. 5th, and they are filled with goodies when they get up the next morning. One mom shared that she finds an Advent book each year to give, besides the chocolate gold coins.
 Our Lady of Guadalupe (Dec. 12) can be celebrated with some roses (felt or real) on a table runner, reminding us of the flowers falling from the tunic of St. Juan Diego, and some Mexican food for dinner.
 On St. Lucy's day, (Dec. 13) we plan on dressing Lucy in a homemade, simple white dress made from eyelet sewn on daddy's white shirt collar, and a red ribbon around her waist. She'll treat us with hot chocolate and a sweet treat for breakfast. So many things to celebrate this season! There were lots of other wonderful traditions shared at the brunch, but these seem like a good start.

 I am scaling back on all the ideas I had for gift-making so we can slow it down and be at peace. Like one lady at brunch said, if your traditions are going to make you shout at the kids, don't do them. Keep it simple. Nevertheless, you can't expect me not to make anything. So, check back here for some gift ideas, including several easy do-it-yourself presents.


November 7, 2013

Montessori and Sewing

 It happens every year about this time. The "rain, rain, rain comes down, down, down" in Washington, and my thoughts naturally turn to gifts I plan to make for Christmas and kids' birthdays. It helps me get excited for the cosy, gray months ahead. 


I've just cast on a new knitting project, and I'm thankful for Facebook, which connected me with more experienced knitters who could help me solve a beginner's dilemma. Making gifts inspires me to try new things, like cabling, in this case. 
 But as often happens with young artists in the house, my four year old grabbed the needles this morning and tried to pick up where I left off. We relocated the knitting to a safer, higher location, and grabbed this project for Lu. 


I cut a piece of burlap to fit inside an embroidery hoop, and threaded a plastic needle (from their lace card set) with scrap yarn I had. This way Lu can start learning the basics of sewing safely, and with confidence. Once she gets the hang of it, we plan on sketching designs she can sew or embroider. And my knitting project is safer. 

How do you settle in for winter?

October 28, 2013

Door Knob Makeover

 Little inexpensive finishes can make a big difference.  Take,  for instance, our doors. Some of them badly chipped and worn, all adorned with gold handles, some with silver on one side. We made a trip to the hardware store to compare prices and explore our options. The least expensive handles in the style we liked were about eleven dollars each. We needed nine, so for about one hundred dollars, we could have all new handles. Or, we could lightly sand our existing handles with a fine grit sandpaper, spray with this:


  ...and have the style we liked for less than ten dollars total. Not bad. So my husband is patiently taking down all the doors in need of sanding and a fresh coat of paint, removing the handles, and turning this:


Into this!


And they are holding up great. All for 1/10 the cost. Love it.

October 23, 2013

Restoration Hardware


 .
 Our kitchen is in the process of getting a much needed makeover. We have been experimenting and budgeting to see what we can and should do. One of the items on the priority list is changing the hardware. Our existing hinges were covered in thick coats of paint, which we needed to remove. Here's how to do it. First, cover the bottom of an old pan with baking soda (preferably a pan you don't plan on using again.)


 Put your hardware in the pot and cover with water. Boil for thirty minutes. 


 When the timer goes off, remove the metal object with a pair of tongs and place on wax paper or foil. 


 Most of the paint should peel off with your hands. You might need a metal tool to get into the crevices. If the paint is stubborn or in multiple layers, you might need to repeat the process until all the paint is gone. 


If you have cool, interesting or original hardware, this is a natural way to restore metal pieces without resorting to harsh paint stripping chemicals. Once you've removed the paint, you can polish with a 2-in-1 oil or other metal oil to revive the metal. 

October 8, 2013

Pumpkin Patch


 A gorgeous sunny day. A list of chores on the one hand, a warm October afternoon on the other.
Option 1: Stay and clean. Option 2: Clean later and go enjoy the outdoors. We went with option #2. That sun was just calling me outdoors. Leave the chores for a rainy day. Today we are going to meet friends at the pumpkin patch. We need us some pumpkins. Bumpy, round, adorable pumpkins. And now we are warming up to the idea of fall.


Driving across these bridges on our way to Sauvie Island Pumpkin Patch, I was reminded of the many reasons I love the Pacific Northwest. My jaw dropped crossing this first bridge; I had a view of Mt. Hood, Mt. St. Helens, and, I think, Mt. Adams (or Rainier)? Wow, incredible. 


Happy Fall, 
Jess

September 23, 2013

Baby Boy Gifts

 We just got home from a trip to the East Coast. I hope to post some pictures of all our exploring soon, but first I wanted to follow up with gifts I made for a friend. Her boy is due next month, and she is busy decorating the nursery in a woodland theme.

Tummy time quilt

Hedgehog and flannel burp cloths


I also knit him a pair of orange ribbed legwarmers, but forgot to take a picture before I gave them. They are in Ohio, so, sadly. no pictures until I make more. To make a pair yourself, check out this post. For a ribbed 'boyish' set, cast on 12 stitches on three double pointed needles. Continue knitting each row with knit 2 purl 2, until you reach your desired length. Cast off. I recently posted a basic knitting tutorial if you aren't sure how to cast on, knit, purl, or cast off.

We are taking in the last moments of warmth before the cold, gray fall weather officially sets in. I am not  ready to say goodbye to the sun. Not yet. I plan to take advantage of the few days of sun promised in this week's forecast.

Strawberry Rhubarb Crisp

Freshly picked

Lil' sweety