May 31, 2012

Exploration


 I'll be honest with you. We've been traveling a lot lately, and I am anxious to be home to cross things off the 'to do' list. So when we had to leave again this week for work, I was not jumping up and down. We hit the road, and about thirty minutes into the drive, I made up my mind to relax. let go of the mental list, and enjoy some time with the fam.


As usual, I'm glad we have this time together. 


May 23, 2012

Kitchen Garden


Even if it is just for a few minutes to enjoy sunbursts, getting out to work in the garden is so peaceful.


May 18, 2012

Creative Lull


The hubby took the kids on a date so I took a few minutes on Pinterest to get inspired for project mode. My head is swarming this morning and I need to reign it in before I can get anything accomplished. Do you ever have days like that?

Back to work. I think a pretty skirt and tee shirt will set all right.

May 15, 2012

Back from Wenanchee


 We spent last week in Wenanchee, Wa. We felt like we were tucked away in another world. Or maybe another country. So peaceful and beautiful.


May 7, 2012

Narrowing Paint Colors

 Just before I was married, a friend of mine helped my soon to be hubby paint our first apartment while I was planning my wedding across the country. It was seriously one of my favorite gifts. That apartment has always been my favorite home. It was small, cozy and inviting. Our landlord had us stick to neutrals, except in the bathroom where we chose a blue green color. If I remember correctly, a close friend with impeccable taste chose most of the colors. And I loved every room.

 Now we are choosing colors again, this time for our own home. I email color ideas to my friend across country. I've been having a hard time deciding, but there are a few things I've learned to narrow down options.

 1. Start by deciding what you want to change in the room and what will be staying. For example, we can't afford to change our existing floors and counters in the kitchen. So I need to pick colors matching blue, gray and brown.

2. Once you know what's staying in the room, choose the mood you want to create. Calm or loud, airy or dark, etc.

 3. Consider lighting in the room. If the room does not get a lot of light, choose colors that reflect light for a lighter feel. The same paint will look different at all times of day, so make sure you like the color after dinner as well as you do after crepes in the morning. 

 4. Find an item or picture as a springboard for the room. This could be a favorite outfit, a magazine picture, or the colors in a bowl. Make sure to find something that matches the the room's color scheme. The main colors in our living room, for example, are greens, blue greens, and a small touch of dark pink. I found this photo that had our existing colors, which helped me think outside the box of just plain walls. I can go a little bold on the top of the wall, but keep the room bright with the bottom.


                                                              for more photos of this home  
        
  I am trying to find a similar color for the top of the wall, so I used some favorite items in our home to visualize what it might look like with the greens and teals I already have. When it comes to accessories, I obviously gravitate toward this:


5. Before committing to the color, buy a sample of your top picks and paint a strip on the wall. If you have time, live with it for a couple days and see what you think. If the color is one you saw listed in a magazine, or in someone's home, it will look different in yours. Testing a color first will save money in the long run rather than buying a couple gallons of a color you're not happy with.

 6. Create a flow between rooms. Especially in a smaller home, and in adjoining rooms, you can create the illusion of space with similar shades. The colors in the living room should match the kitchen, especially if one room is visible from the other. These are the dining room and kitchen from the home above. The same color was used throughout the home, and it looks distinct in each room.


*** 
 
 Above all , have fun and enjoy yourself. It's just paint after all.

May 5, 2012

Welcome Home Gift

 Recently while I was finishing my bedtime ritual, I had an "aha" moment. This blog began as a record of my creative endeavors. It helps motivate me to finish projects and hopefully share some "how to" techniques along the way.

 I am super excited to share the vision of my blog with you guys. One of my favorite pastimes is designing and creating gifts for people. Love it. Sometimes I look for an excuse to give gifts just so I can learn new sewing techniques. I have so much to learn and so many ideas to share. Should be a good time.

 Thanks for reading.

Carrot Cupcakes with Toasted Coconut as a Surprise the Kids Help Make Yesterday for Daddy to Welcome Him Home after a Week Away

May 3, 2012

Drop Cloth Tea Cozy in 10 Steps

Tea time is one of my daily links to sanity. Tazo's Chai, Earl Grey, English or Irish Breakfast, and Calm are stocked in my cupboard. Add a splash of almond milk and some honey and you're in business.
   If  you want to share a spot of tea with your mom or grandma, tea cozies are quick and simple to make, and keep your cup warm for hours.
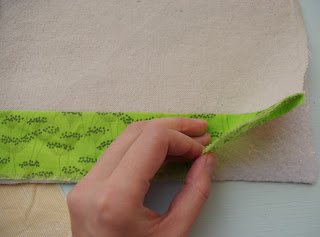
 I modified the top of the cozy in the photos and added a fabric strip to the bottom of the front. These directions, however, are for sewing a basic, semi-circle cozy, but there are lots of way to personalize it. Here's how to make one.


You need:
 2 fabric pieces for the outer fabric
 2 pieces of insulator (cotton batting or Insul-Brite)
 2 fabric pieces for the inner fabric
 1 small fabric strip for the top "handle"

1. Draft a pattern:

 a) Width- Measure the entire tea pot's circumference with a tape measure. Be sure to include the handle and spout. Divide this number by 2, and then add 3 in. for the seam allowance.

 b) Height- Starting at the table on one side, measure up over the top and down the other side. Divide this number by two, and add 3 in. for height.
 So, if the tea pot measures 16 in. wide by 12 in. tall, the pattern should be 11in. x 9in.

 c) To create a pattern piece, simply draw a rectangle on a paper bag or pattern paper according to the dimensions from the tea pot. Next, cut the rectangle out and fold it in half. Round out the top of the pattern to resemble a half circle, or any shape you desire.

2. Cut materials:

 a) Place the pattern onto the outer fabric and pin in place. Cut two of the outer fabric, two of the insulator, and two of the inner fabric.

b) Cut out a small rectangle from the outer or fabric measuring approx. 3" x 2". Fold the strip right sides together and sew along the open edge. Turn inside out, press, and sew along both sides.

3. Assemble pieces:


  Place the pieces on a tabletop in this order: Batting, outer front fabric right side up, handle folded in half with raw edges facing the cozy's top and loop tucked in, back outer fabric right side down, and batting.

4. Pin pieces together.

5. Stitch all pieces together around the sides and top. Leave the bottom edge for now.


6. Remove pins. Turn inside out.

7. Lay the inside lining fabric with right sides together. Mark the fabric at the top about 3 inches wide as a reminder to leave an opening. Pin the pieces together and sew along the top and sides. Remember not to stitch the 3 in. opening.

8. Place the lining over the cozy so the rights sides are together. Match up side seams and sew all around the bottom to attach.


9. Pull the cozy through the opening on the top created in step 7.

10. Tuck the edges of the opening in and sew it closed. Tuck inside the cozy and ....TA DA. Instant gratification.


Now you can go make a pot of tea and admire your work. Then make another cozy for your mom. You may want to keep this one.